calligraphy envelopes: elevating your correspondence with style
When it comes to sending out letters and invitations, the way you address your envelopes can make a big difference in leaving a lasting impression on your recipients. One way to add a touch of elegance and sophistication to your correspondence is by using calligraphy envelopes. In this article, we will explore the art of calligraphy, how it can enhance your envelopes, and provide tips on how to address envelopes with calligraphy.
What is calligraphy and how can it enhance your envelopes?
Understanding the art of calligraphy
Calligraphy is the art of beautiful and decorative handwriting. It involves using special pens or brushes to create stylized letters, often with flourishes and variations in stroke width. Calligraphy has a long history and is appreciated for its aesthetic appeal and artistic expression.
Benefits of using calligraphy on envelopes
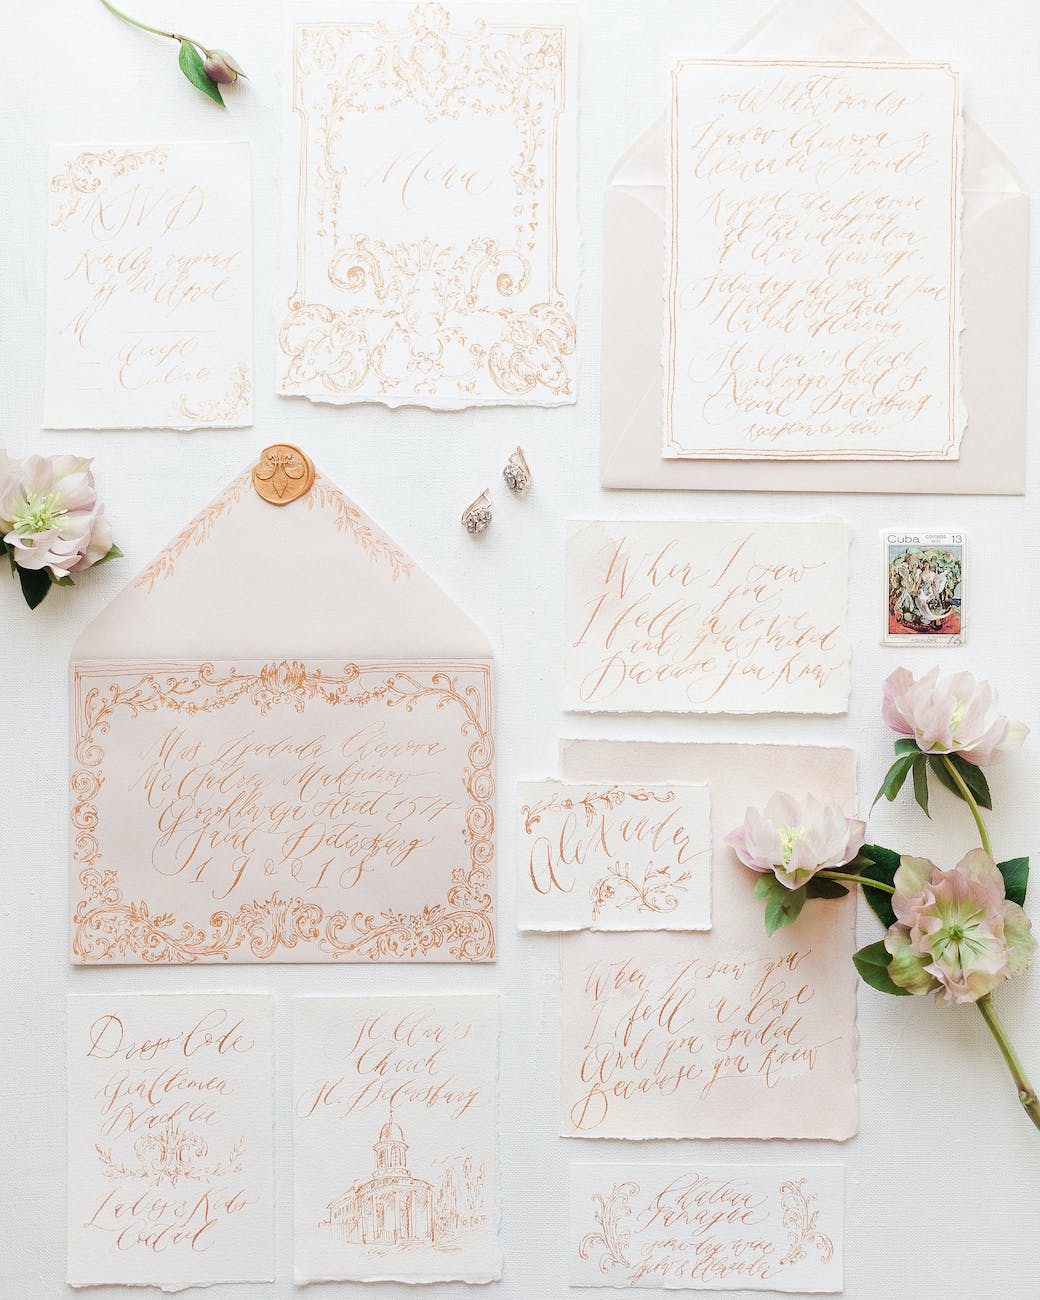
Using calligraphy on your envelopes can greatly enhance the overall presentation of your correspondence. Calligraphy adds a personal and elegant touch, making your envelopes stand out and creating anticipation for what’s inside. It shows that you took the time and effort to address each envelope with care, elevating the perceived value of your message.
Choosing the right calligraphy style for your envelopes
There are various calligraphy styles to choose from, ranging from traditional to modern. It’s important to consider the tone and theme of your event or letter when selecting a calligraphy style. Traditional calligraphy styles, such as Copperplate or Spencerian, exude a classic and timeless elegance, while modern calligraphy styles offer a more contemporary and trendy feel. Consider your audience and the style that best complements your message.
How to address envelopes with calligraphy?
Step-by-step guide to addressing envelopes
Addressing envelopes with calligraphy requires attention to detail and practice. Here is a step-by-step guide to help you address envelopes with calligraphy:
- Gather your materials, including calligraphy pens, ink, envelopes, and a practice sheet.
- Start by writing the recipient’s name in cursive, using a pointed pen or brush pen.
- Next, write the address, starting with the street name and number, followed by the city, state, and zip code.
- Use guidelines or a light pencil to ensure consistent spacing and alignment.
- Add any additional details such as apartment numbers or suite numbers.
- Once you are satisfied with the layout and spacing, go over the address with your chosen ink color.
- Allow the ink to dry completely before handling the envelope.
- Repeat the process for each envelope, taking breaks as needed to maintain concentration and accuracy.
Tips for achieving professional-looking calligraphy
Here are some tips to help you achieve professional-looking calligraphy:
- Practice regularly to improve your calligraphy skills and develop muscle memory.
- Pay attention to letterforms and strive for consistency in size and shape.
- Experiment with different nibs and inks to find the combination that works best for you.
- Take breaks to avoid fatigue and ensure steady hand movements.
- Don’t be afraid to make mistakes – embrace them as an opportunity to learn and improve.
- Use light, consistent pressure when applying the ink to achieve a smooth and even line.
- Practice flourish and decorative elements to add personality to your calligraphy.
Common mistakes to avoid when addressing envelopes with calligraphy
Addressing envelopes with calligraphy can be challenging, especially when starting. Here are some common mistakes to avoid:
- Rushing through the process – take your time and focus on each stroke.
- Using the wrong size nib for the size of the envelope – select a nib that matches the scale of your envelopes.
- Not practicing enough – regular practice will help you gain confidence and refine your calligraphy skills.
- Ignoring spacing and alignment – pay attention to consistent spacing between letters and lines.
- Overusing flourishes – while flourishes can add elegance, be mindful not to overwhelm the address.
- Skipping ink drying time – allow the ink to dry completely before handling the envelopes to avoid smudging.
Where can you learn calligraphy for envelope addressing?
Exploring calligraphy classes and workshops
Attending calligraphy classes and workshops is an excellent way to learn and refine your calligraphy skills. Many local art studios and community centers offer calligraphy classes taught by experienced calligraphers. These classes provide an opportunity to learn proper technique, receive personalized guidance, and connect with fellow enthusiasts.
Online resources for learning calligraphy
If you prefer to learn at your own pace or don’t have access to local classes, there are numerous online resources available. Websites and platforms such as Skillshare, Udemy, and YouTube offer a wide range of calligraphy tutorials and courses taught by experts in the field. These resources often include step-by-step instructions, demonstrations, and downloadable practice sheets.
Finding inspiration and tutorials on Pinterest
Pinterest is a treasure trove of inspiration and tutorials for calligraphy enthusiasts. Search for calligraphy-related boards and accounts to discover a vast collection of envelope addressing ideas, lettering techniques, and creative design inspiration. Follow your favorite calligraphers on Pinterest to stay updated with their latest projects and tips.
Why should you use calligraphy envelopes for weddings and invitations?
Creating an elegant and personal touch
Weddings and other special events call for extra attention to detail and personalization. By using calligraphy envelopes, you can create a sense of elegance and individuality that sets your invitations apart. Calligraphy adds a touch of sophistication and shows your guests that you value their presence.
Impressing your guests with custom calligraphy envelopes
Custom calligraphy envelopes are sure to make a lasting impression on your guests. The handwritten addresses stand out among other mail, creating a sense of excitement and anticipation. This small but significant personal touch shows your guests that you went the extra mile to make them feel special.
Incorporating calligraphy into your entire invitation suite
Using calligraphy on your envelopes can be integrated into other elements of your invitation suite, such as escort cards, place cards, and menu cards. Consistency in design and calligraphy style can tie all the elements together, creating a cohesive and visually stunning presentation.
What materials do you need for calligraphy envelope addressing?
Choosing the right pens and inks
When it comes to calligraphy pens, there are various options to choose from. Dip pens with interchangeable nibs are popular among calligraphers as they allow for greater customization. Brush pens are a convenient alternative, especially for beginners or those who prefer a more flexible tool. As for inks, traditional black ink is a classic choice, but you can also explore other colors, such as metallic or white ink, to create more unique and eye-catching envelopes.
Exploring different envelope design options
The design of your envelopes can also enhance the overall presentation. Consider using high-quality envelopes in various colors or textures to add a touch of luxury. Experiment with different envelope sizes and shapes to suit the occasion. Transparent envelopes can be an interesting choice if you want to showcase your calligraphy on both the front and back of the envelope.
Tips for addressing envelopes with a pointed pen
If you are using a pointed pen for addressing envelopes, here are some tips to keep in mind:
- Hold the pen at a 45-degree angle to achieve the desired stroke width variation.
- Practice the pressure exerted on the nib to create thin upstrokes and thicker downstrokes.
- Use smooth and controlled movements to maintain consistency in the letterforms.
- Experiment with different nib sizes to find the one that works best for the size of your envelopes.
- Try different ink colors to add a pop of personality to your calligraphy.
- Use guidelines or a light pencil to ensure consistent spacing and alignment.
By incorporating calligraphy into your envelope addressing, you can elevate your correspondence and leave a lasting impression on your recipients. Whether it’s for a wedding, special event, or personal letter, calligraphy envelopes add a touch of elegance and style that is sure to impress. Remember to practice regularly, choose the right materials, and pay attention to detail, and with time, your calligraphy skills will flourish.