Pyrography for Jewelry Making: Wood Burning Techniques for Pendants, Earrings and More
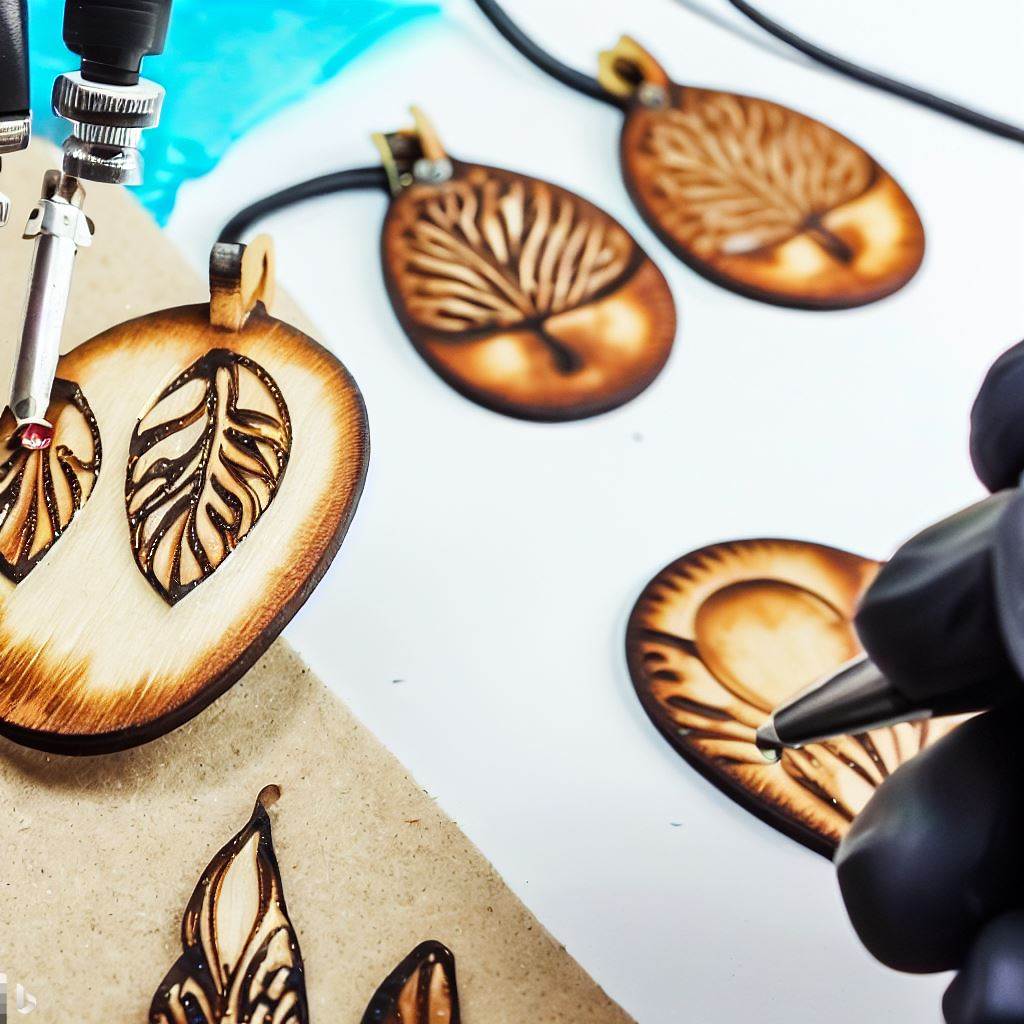
Pyrography is not just limited to decorating flat planks. Adding burned designs to jewelry introduces more intimate, wearable ways to enjoy wood artistry. The delicate nature of jewelry calls for precise control over the pyro pen. But with practice, pyrographers can adorn pendants, earrings, bracelets, rings, and other accessories with beautiful personalized fire-born accents.
This guide explores adapting pyro techniques for embellishing jewelry. We’ll cover everything from choosing suitable materials, specialized tools, planning compositions, burning methods, finishing, and final assembly. Following these tips, you’ll be able to outfit yourself and loved ones with gorgeous hand-burned wooden jewelry.
Materials for Burning Jewelry Pieces
Choosing appropriate materials is crucial when burning delicate jewelry components. Avoid soft and porous woods that splinter easily. Instead look for:
Hardwood Veneers
Veneers provide very thin and stable sheets for burning jewelry-sized pieces. Popular types like maple, walnut, oak, aspen, and holly burn consistently without warping. Buy assortments to experiment.
Exotic Hardwoods
Small offcuts of hardwoods like ebony, bloodwood, bubinga, purpleheart, etc. take pyrography beautifully. Their density helps jewelry pieces withstand regular wear. Stunning colors and grain patterns also emerge when burned.
Wood Slices
Cut thin slices from branches/twigs to make round beads, pendants, and other circular elements. Birch, maple, and ash slices work well. Cut precisely to enable drilling holes later. Remove the bark first for easier burning.
Bamboo
Bamboo’s smooth hard surface happily accepts pyrography. The fibrous sections create interesting lined details across pendants and beads when split. Use flattened bamboo strips for bangle bracelets.
Check Wood Grain
Inspect wood grain closely to ensure a tight uniform pattern without tearing, knots, or weak sections. Strength and stability are vital with worn jewelry that will see movement and friction.
Jewelry Pyrography Supplies
Standard pyro tools can be used, but jewelry-making also benefits from these more specialized supplies:
Detail Pyro Tips
Extra small fixed nibs allow meticulous control for burning intricate jewelry designs in tight spaces. Look for micro burning heads sized around 1 mm to 3 mm.
Sapphire Burner
This fixed sapphire tip lets you drag fanned lines outward like drawing pen strokes. Ideal for exacting flowing patterns. Can also stipple delicate textures.
Skew Nib
A moveable nib is helpful for achieving very fine lines at precise angles by dragging skewed. Great for details like filigree, veins, textures, etc.
High Heat Pen
A handheld high heat pen (butane powered or electric) gives portability for burning bracelets, rings, etc. Configure with a sharp tip attachment.
Magnifier
Jewelry work requires keen vision. Get a quality magnifying lens on a stand so you can see small areas up close while burning.
Jewelry Pliers
Invest in quality chain nose, round nose, and flat nose jewelry pliers suitable for grasping small pieces without marring the wood.
Fine Drill Bits
Tiny drill bits are needed to create holes for stringing jewelry pieces. Acquire a range from 1 mm to 3 mm for different bead and pendant sizes.
Design Considerations
Planning your pyroged jewelry requires adapting for the smaller format:
Size Appropriately
Design elements appropriately for each piece’s dimensions. A 1” pendant can showcase details a 0.5” earring post cannot. Enlarge reference imagery as needed.
Watch Proportions
Maintain correct spatial relationships as you downsize. Burning too large or small ruins the scale. Have a reference handy for double checking as you go.
Focus the Focal Point
Use one clear dominant focal point in the composition. On pendants, this is often the center area. Lead the eye cleanly to the key feature or theme.
Mind the Borders
Consider the outer edges and borders. Will the shape be geometric, organic, ornate, plain? Don’t let design elements get cut midway by tight margins.
Plan Back and Front
Decide what elements will go on the front and back sides respectively. Consistency provides harmony. Plan so holes and connections don’t interfere with the design.
Leave Burning Space
Avoid overcrowding. Leave ample whitespace around and between burned elements. This allows the composition to breathe on small pieces and draws focus to what matters most.
Adapting Pyrography Techniques
Burning intricate one-of-a-kind designs on jewelry introduces unique demands compared to basic plank burning:
Work Near Heat Source
You’ll be burning small areas at once, so keep your pyro tool heat station close at hand. Repeatedly moving long distances risks cooling the tip.
Brace Pieces Securely
Use pliers, clamps, stands, etc. to reliably hold tiny jewelry pieces for precision burning. Even minimal shaking or slipping ruins the careful designs.
Burn Lightly
With thin materials, a hot tool can burn through very quickly. Keep temperature lower and make gradual layered passes to control depth.
Mind Fine Details
Take extra time on details like filigree, veins, texture lines, etc. Rushing leads to sloppiness amplified on small pieces. Patience pays off.
Let Sections Cool
Give burned areas time to fully cool before burning adjacent sections to avoid unintended scorching. Come back to elements as needed.
Check Progress Frequently
Compare frequently against your reference to ensure elements are burning true to the planned size, shape and location. Catch issues early.
Finish with Sanding
Go over the entire piece lightly with fine sandpaper after burning to smooth rough areas and remove ash. This refines the surfaces.
Methods for Joining Jewelry
There are several options for assembling your pyrographed wooden components into finished jewelry:
Stringing
Simple necklaces and bracelets can string beads and pendants on natural fibers like cotton cord or hemp. Use crimp beads and clasps for clean closure and ends.
Knotting
Space beads apart with precise symmetrical knots. Macrame and other knotting techniques add interest between burned elements. Good for chokers and lace-like effects.
Chain
Connect pendants and sections with fine jewelry chain using jump rings, lobster clasps, etc. Add extensions or shorten as needed. Choose metals like sterling silver that complement the wood tones.
Wire Wrapping
Wrap pendants and stones with thin wires like copper in decorative binding patterns. Hammering work-hardens and smooths the wire. Simple but elegant embellishment.
Riveting
Use a jewelry hammer to peen tiny rivets through drilled holes to connect layered leather cuffs, beaded sections, etc. Provides a durable yet flexible join.
Gluing
For items like earrings, brooches, rings, etc. use clear strong 2-part epoxy or UV-cured resin to join wooden elements. Reinforce from behind.
Applying Protective Finishes
Seal and finish pyrographed jewelry for protection from wear:
Epoxy Resin
Thin epoxy resin provides waterproofing and sheen. Multiple coats create a clear durable barrier. Can also color tint the epoxy. Allows polishing to a glossy finish.
Urethane
Water-based urethane gives a crystal clear, non-yellowing finish. Flows easily over details. Dries to a smooth protective film resistant to humidity, oils, and abrasion.
Beeswax
Rub solid beeswax into the wood for an eco-friendly satin luster. Buff vigorously. Repeat over time to maintain the protective barrier as needed. Keeps natural texture.
Oil
Food-grade mineral oil enhances the grain while protecting from moisture. Avoid vegetable oils which can go rancid. Add a few drops, let penetrate, then wipe away excess.
Lacquer
Spray lacquer formulated for wood gives a durable finish while retaining vibrancy. Use light even misting coats. Allow to fully cure before wearing to prevent chips.
No matter if you choose simple hemp necklaces or elaborate amulets, handcrafting jewelry with pyrography opens new personalized possibilities. Follow these tips to adapt traditional wood burning for embellishing wearable accessories beautifully. Subtle pyrographic accents can make your handmade jewelry even more special!