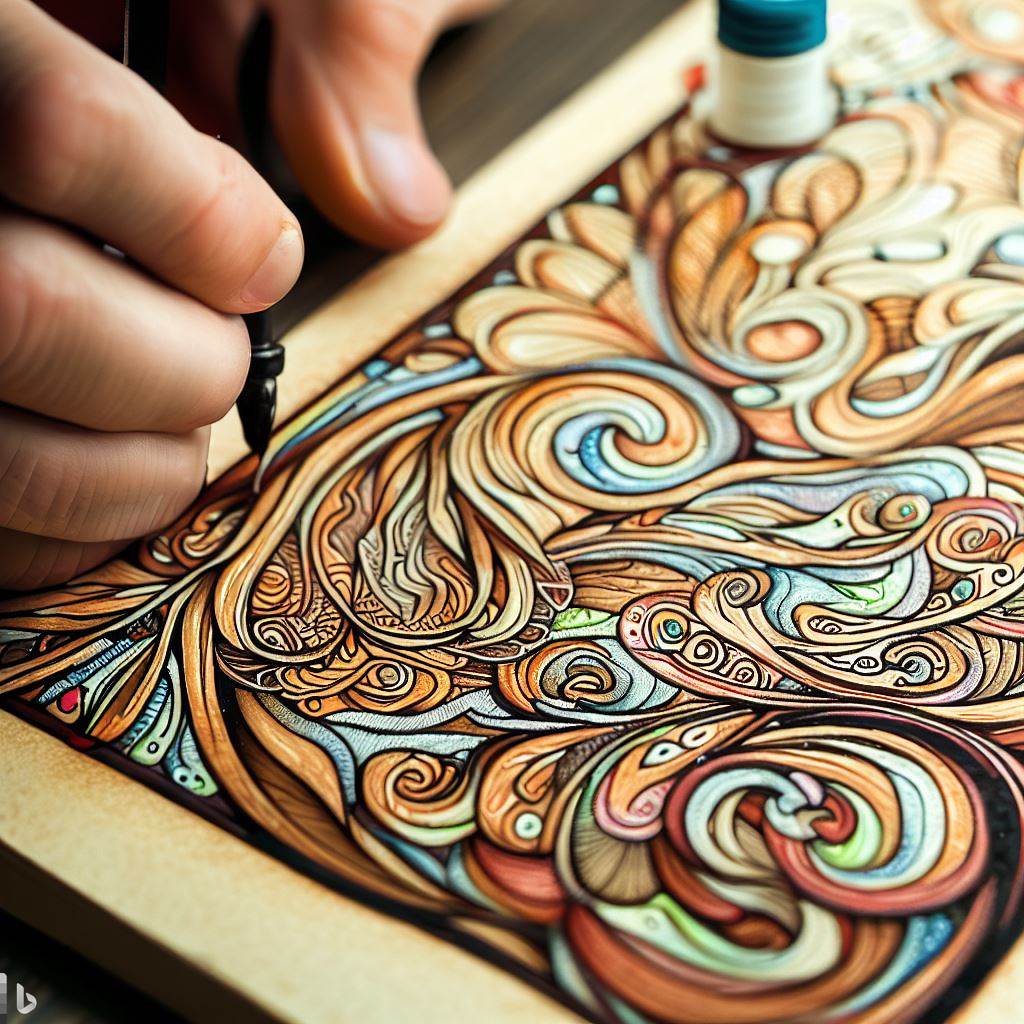
Coloring Finished Pyrography: Adding Color with Paints, Inks and More
Pyrography produces beautiful monochromatic wood burnings. But adding color opens up countless artistic possibilities. Paints, inks, dyes, stains, and more can infuse pyro projects with vibrant hues that complement and enhance the burned details. There are many coloring mediums and techniques to experiment with when taking your wood burning art to the next level.
This guide will explore various options for coloring finished pyrography pieces. Whether aiming for a soft watercolor effect or precise realism with acrylics, properly applying color to burned wood requires some considerations. Factors like preparation, materials, application methods, and sealing are all important to ensure the colors adhere as intended.
Follow these tips to successfully add exciting splashes of color to your completed wood burnings. Pyrography is no longer limited to brown and black – now the full color spectrum can heat up your artwork even more!
Preparing the Surface
Proper preparation is the first step to accepting color well. The surface needs to be properly cleaned, textured, and sealed:
Cleaning
Remove any grease, dirt, or residue from the surface using isopropyl alcohol applied with a cloth. This helps colors adhere evenly. Avoid oil-based cleaners which repel paints.
Sanding
Lightly sanding the wood smooth gives paint an ideal surface to grip. Go up to about 220 grit for a smooth, even foundation. Remove all dust after sanding before applying color.
Sealing (Optional)
Applying a thin sealant like shellac or acrylic medium seals the porous wood so less pigment gets absorbed. This intensifies the vibrancy of colors. However, some artists skip sealing to retain the natural wood grain effects.
Sealing also provides a white base layer for brighter acrylics. Or seal with burnt umber acrylic for warmer undertones. Test on scrap wood to choose your preferred sealing method.
Picking Your Paints and Pigments
With the surface ready, it’s time to select your coloring media. There is an abundance of paints, inks, dyes, and more that work beautifully on burned wood. Consider the characteristics of each to determine your best option:
Acrylic Paint
Acrylics are popular for their versatility. They dry quickly, provide excellent adhesion, and resist fading. Lean towards heavy body paints. Avoid ultra-thin versions which seep into wood grain. Acrylics also act as their own sealant.
Watercolor Paint
For soft, feathered effects, watercolors create beautiful transparent layers. They’re easy to blend but require sealing the wood first since they soak in. Use high-pigment tube watercolors versus lower quality pan sets.
Alcohol Inks
These vivid translucent inks flow and blend smoothly for seamless gradients. They readily absorb into the wood for bright color pops. Use isopropyl alcohol to manipulate and fuse the fast-drying inks.
Colored Pencils
Wax-based colored pencils add intense, opaque color that stands out against dark burned wood. They resist fading and provide control for precision effects. Use professional grade pencils versus cheaper varieties.
Gel Pens
For fine details like veining, lace, filigree, etc. gel pens contain concentrated gouache paint. Once dried, they resist smudging. Choose archival acid-free pens to prevent fading.
India Ink
This classic black ink is waterproof once dry. Dilute it or wipe away for gray shading. Use pens with archival carbon or pigment-based ink versus cheaper varieties that can fade and bleed over time.
Wood Stain/Dye
For coloring the bare wood itself, apply thinned wood stain/dye using a brush or rag. Stain soaks into the grain for integrated color rather than coating the surface like paint. Remember results will be more translucent.
Brushes and Painting Tools
Having the right brushes and tools will make application much easier. Here are some useful options:
- Small round brushes for details
- Larger flats for broad areas
- Fan brushes for blending and softening
- Q-tips for tiny areas
- Toothpicks for dots and lines
- Watercolor pencils for textured effects
- Splatter brush for speckled patterns
- Sponges/rags for rubbing and wiping
Choose synthetic bristles for acrylics and stiffer natural hair bristles for watercolors. Test brushes on scrap wood first to ensure they can flex into the burned grooves. Keep various sizes on hand for versatility.
Painting Techniques
Now for the coloring itself! Approaching it thoughtfully will help the paints complement your precise pyrography rather than hide it. Use these techniques:
Outlining
Outline key contours and details with thin lines using black acrylic paint, ink, or colored pencil. This helps define elements against colored backgrounds.
Stippling/Hatching
Use the tip of the brush to stipple color into areas or make small hatch marks. This builds gradual tones while showing the wood texture below.
Glazing
Slowly build transparent layers of watercolors, inks, or thinned acrylics. Let each layer dry before adding the next for luminous depth.
Wiping
Wipe highlights into paint with a damp paper towel or soft rag to reveal the wood below. Great for creating textured effects.
Dry Brushing
Use a nearly dry brush to lightly whisk over surfaces. It catches the high points leaving paint concentrated along burn grooves and contours.
Splattering
Load a stiff brush and tap rapidly with your finger to spray fine speckles of color for textures like foliage, rocks, hair, etc.
Allow Some Wood Showing
Avoid completely obscuring the wood. Let some areas remain untouched to showcase the natural tones and texture. The contrast between color and raw wood is gorgeous.
Color Theory
Use the color wheel to pick complementary combos that enhance each other. Analogous harmonious colors also work beautifully. Light colors over dark burns will really pop.
Sealing the Finished Piece
The final step is choosing a sealant to protect, unify, and enhance your colored pyrography:
Polyurethane
Polyurethane creates a clear, protective barrier that maintains the vibrancy of pigments. Use a matte or satin finish to avoid an overly glossy look. Allow full drying time between multiple thin coats.
Resin Epoxy
For a thick glossy coat, epoxy resin provides a glass-like finish over colors. Tint the epoxy itself or layer over paints. Allows more texture and dimension from brush strokes versus flat polyurethane.
Shellac
As a natural alternative, shellac enhances and saturates colors without a plastic-like film. Use dewaxed shellac thinned with denatured alcohol. Multiple thin coats prevent yellowing over time.
Varnish
Varnish comes in matte, satin, or gloss sheens. It protects colors while retaining a natural wood feel versus polyurethane’s plastic coating. Use an archival acid-free formula.
No matter your sealing choice, read the label to ensure compatibility with your media. Test first on scrap wood. Resealing may be needed over time if the finish degrades or becomes damaged.
Inspiring Examples to Admire
Looking at talented pyrography artists who add lively color to their work is a great way to spark ideas. Some influential artists to admire include:
- Sue Walters – Vibrant acrylic fantasy scenes
- Lora Irish – Whimsical watercolored songbirds
- Simon Easton – Dramatic animal portraits in acrylic
- Waldemar Januszczak – Hyperrealistic colored pencil drawings
- Valentina Dubasky – Intricate incisings filled with vivid alcohol inks
Seeing what masterful effects can be achieved will inspire your own colorful endeavors. Use their finished pieces as a benchmark to strive for.
Embrace the Colorful Journey
Adding color allows you to take pyrography art in exciting new directions no longer confined to monochrome. There’s an incredible array of pigments and techniques to experiment with. Relish the creative journey as you learn which methods resonate best with your artistic vision.
Be willing to test different materials as each has unique merits. Don’t worry about perfection right away – just have fun seeing what effects emerge from different coloring mediums interacting with your burn marks. The beauty is often in the surprises rather than attempting rigid control. And completing a variety of smaller colored studies will teach you far more than one ambitious large piece.
Soon the hues, values, textures, and sheens will come together harmoniously, elevating your pyrography art beyond what either could achieve alone. No longer will the flame be limited to burning wood – it will be free to ignite a full spectrum of vibrant color!